笔记
算术运算指令
| 指令 | 语法 | 描述 | 例子 |
|---|---|---|---|
| add | add rd, rs1, rs2 | rs1和rs2的值相加,结果保存到rd | add x5, x6, x7 |
| sub | sub rd, rs1, rs2 | rs1的值减去rs2的值,结果保存到rd | sub x5, x6, x7 |
| addi | addi rd, rs1, imm | rs1的值和imm相加,结果保存到rd | addi x5, x6, 100 |
| lui | lui rd, imm | 构造一个32位的数,高20位存放imm,低12位清零。结果保存到rd | lui x5, 0x12345 |
| auipc | auipc rd, imm | 构造一个32位的数,高20位存放imm,低12位清零。结果和pc相加后保存到rd | auipc x5, 0x12345 |
| 伪指令 | 语法 | 等价指令 | 描述 | 例子 |
|---|---|---|---|---|
| li | li rd, imm | lui和addi的组合 | 将立即数imm加载到rd中 | li x5, 0x12345678 |
| la | la rd, label | auipc和addi的组合 | 为rd加载一个地址值 | la x5, label |
| neg | neg rd, rs | sub rd, x0, rs | 对rs中的值取反并将结果存放在rd中 | neg x5, x6 |
| mv | mv rd, rs | addi rd, rs, 0 | 将rs中的值拷贝到rd中 | mv x5, x6 |
| nop | nop | addi x0, x0, 0 | 什么也不做 | nop |
ADD
| 语法 | add rd, rs1, rs2 | |
|---|---|---|
| 例子 | add x5, x6, x7 | x5 = x6 + x7 |
- 编码格式:R-type, 寄存器类型
- opcode:0110011
- 符号拓展:最高位(符号位)为1,零扩展:最高位(符号位)为0
- 有符号数在计算机中表示:二进制补码
- 补码→原码:减一取反
SUB
| 语法 | sub rd, rs1, rs2 | |
|---|---|---|
| 例子 | sub x5, x6, x7 | x5 = x6 - x7 |
ADDI
| 语法 | addi rd, rs1, IMM | |
|---|---|---|
| 例子 | addi x5, x6, 1 | x5 = x6 + 1 |
- 编码格式:I-type,立即数格式
- opcode:0b0010011
- 缺陷:
- immediate立即数占12位
- 参与运算时会被符号拓展为一个32位的数
- 这个立即数表示的范围为[-2048, 2047)
- RISCV没有提供subi指令
- 问题:如何构造大数,一个32位的数
- 思路:
- 引入一个新的命令先设置高20位,存放在rs1
- 然后复用现有的addi命令补上剩余的低12位即可
- [LUI指令](#LUI(Lod Upper Immediate))
- 思路:
基于算术运算指令实现的其他伪指令
| 伪指令 | 语法 | 等价指令 | 指令描述 | 例子 |
|---|---|---|---|---|
| neg | neg rd, rs | sub rd, x0, rs | 对rs中的值取反并将结果存放在rd中 | neg x5, x6 |
| mv | mv rd, rs | addi rd, rs, 0 | 将rs中的值拷贝到rd中 | mv x5, x6 |
| nop | nop | addi x0, x0, 0 | 什么也不做 | nop |
LUI(Lod Upper Immediate)
| 语法 | lui rd, imm | |
|---|---|---|
| 例子 | lui x5, 0x12345 | x5 = 0x12345 << 12 |
编码格式:U-type
- opcode:0b0110111
lui指令构造一个32bits的立即数,这个立即数的高20位对应指令中的imm,低12位清零。这个立即数作为结果存放在rd中
利用lui+addi来为寄存器加载一个大数:
0x12345678
lui x1, 0x12345
addi x1, x1, 0x678
特殊情况:0x12345FFF:0xFFF是个负数,直接用addi是错误的
lui x1, 0x12346
addi x1, x1, -1
LI
| 语法 | li rd, imm | |
|---|---|---|
| 例子 | li x5, 0x12345789 | x5 = 0x12345678 |
- li是一个伪指令
- 汇编器会根据imm的实际情况自动生成正确的真实指令
- 用来代替lui
AUIPC
| 语法 | auipc rd, imm | |
|---|---|---|
| 例子 | auipc x5, 0x12345 | x5 = 0x12345 << 12 + PC |
- 编码格式:U-type
- 和lui指令类似,auipc指令构造一个32bits的立即数,这个立即数高20位对应指令中的imm,低12位清零。不同的是auipc会先将这个立即数和pc值相加,将相加的结果放入rd中
- 用于构造相对地址:相对PC值
LA(Load Address)
| 语法 | la rd, label | |
|---|---|---|
| 例子 | la x5, foo |
- LA是一个伪指令
- 具体编程时给出需要加载的label,编译器会根据实际情况利用auipc和其他指令自动生成正确的指令序列
- 常用于加载一个函数或变量地址
逻辑运算指令
| 指令 | 格式 | 语法 | 描述 | 例子 |
|---|---|---|---|---|
| AND | R-type | AND RD, RS1, RS2 | RD = RS1 & RS2 | and x5, x6, x7 |
| OR | R-type | OR RD, RS1, RS2 | RD = RS1 | RS2 | or x5, x6, x7 |
| XOR | R-type | XOR RD, RS1, RS2 | RD = RS1 ^ RS2 | xor x5, x6, x7 |
| ANDI | I-type | ANDI RD, RS1, RS2 | RD = RS1 & IMM | andi x5, x6, 20 |
| ORI | I-type | ORI RD, RS1, RS2 | RD = RS1 | IMM | ori x5, x6, 20 |
| XORI | I-type | XORI RD, RS1, IMM | RD = RS1 ^ IMM | xor x5, x6, 20 |
- 逻辑指令都是按位操作
- xor(异或):相同为0,相异为1
| 伪指令 | 语法 | 等价指令 | 描述 | 例子 |
|---|---|---|---|---|
| NOT | NOT RD, RS | XORI RD, RS, -1 | 对RS的值取反,结果存在RD中 | not x5, x6 |
这里-1表示为16进制就是 0xFFFFFFFF,在和RS中的值异或,就达到取反的目的
移位运算指令
逻辑移位
| 指令 | 格式 | 语法 | 描述 | 例子 |
|---|---|---|---|---|
| SLL | R-type | SLL RD, RS1, RS2 | 逻辑左移 | sll x5, x6, x7 |
| SRL | R-type | SRL RD, RS1, RS2 | 逻辑右移 | srl x5, x6, x7 |
| SLLI | I-type | SRLLI RD, RS1, IMM | 逻辑左移立即数 | slli x5, x6, 3 |
| SRLI | I-type | SRLI RD, RS1, IMM | 逻辑右移立即数 | srli x5, x6, 3 |
- 逻辑左移、逻辑右移都是补0
算术移位
| 指令 | 格式 | 语法 | 描述 | 例子 |
|---|---|---|---|---|
| SRA | R-type | SRA RD, RS1, RS2 | 算术右移 RD = RS1 >> RS2 | sra x5, x6, x7 |
| SRAI | I-type | SRAI RD, RS1, IMM | 算术右移立即数 RD = RS1 >> IMM | srai x5, x6, 3 |
- 算术右移时按照符号位值填充
- 算术移位只有右移,没有左移:左移会把符号位移走,就没意义了
- 算术移位可以作为负数除法
内存读写指令
- 内存读指令:Load,将数据从内存读入寄存器
- 内存写指令:Store,将数据从寄存器写出内存
内存读(Load)
| 指令 | 格式 | 语法 | 描述 | 例子 |
|---|---|---|---|---|
| LB | I-type | LB RD, IMM(RS1) | Load Byte,从内存中读取一个8bits的数据到RD中,内存地址 = RS1 + IMM | lb x5, 40(x6) |
| LBU | I-type | LBU RD, IMM(RS1) | Load Byte,从内存中读取一个8bit的数据到RD中 | |
//TODO
exercises
ch3 编译与链接
练习3-1
使⽤ gcc 编译代码并使⽤ binutils ⼯具对⽣成的⽬标文件和可执⾏文件(ELF 格式)进⾏分析。具体要求如下:
编写⼀个简单的打印 “hello world!” 的程序源文件:
hello.c1
2
3
4
5
6
7
int main(void)
{
printf("hello world!\n");
return 0;
}对源文件进⾏本地编译,⽣成针对⽀持 x86_64 指令集架构处理器的⽬标文件
hello.o。1
gcc hello.c -c -o hello.o
补充gcc常用选项:
gcc [options] [filename]常用选项 含义 -E 只做预处理 -c 只编译不连接,生成目标文件”.o” -S 生成汇编代码 -o file 把输出生成到由file指定文件名的文件中 -g 在输出的文件中加入支持调试的信息 -v 显示输出详细的命令执行过程信息 查看
hello.o的文件的文件头信息。1
readelf -h hell.o
信息如下:
1
2
3
4
5
6
7
8
9
10
11
12
13
14
15
16
17
18
19
20ELF 头:
Magic: 7f 45 4c 46 02 01 01 00 00 00 00 00 00 00 00 00
类别: ELF64
数据: 2 补码,小端序 (little endian)
Version: 1 (current)
OS/ABI: UNIX - System V
ABI 版本: 0
类型: REL (可重定位文件)
系统架构: Advanced Micro Devices X86-64
版本: 0x1
入口点地址: 0x0
程序头起点: 0 (bytes into file)
Start of section headers: 792 (bytes into file)
标志: 0x0
Size of this header: 64 (bytes)
Size of program headers: 0 (bytes)
Number of program headers: 0
Size of section headers: 64 (bytes)
Number of section headers: 14
Section header string table index: 13
查看
hello.o的 Section header table。1
readelf -SW hello.c
信息如下:
1
2
3
4
5
6
7
8
9
10
11
12
13
14
15
16
17
18
19
20
21
22
23There are 14 section headers, starting at offset 0x318:
节头:
[Nr] Name Type Address Off Size ES Flg Lk Inf Al
[ 0] NULL 0000000000000000 000000 000000 00 0 0 0
[ 1] .text PROGBITS 0000000000000000 000040 00001b 00 AX 0 0 1
[ 2] .rela.text RELA 0000000000000000 000258 000030 18 I 11 1 8
[ 3] .data PROGBITS 0000000000000000 00005b 000000 00 WA 0 0 1
[ 4] .bss NOBITS 0000000000000000 00005b 000000 00 WA 0 0 1
[ 5] .rodata PROGBITS 0000000000000000 00005b 00000d 00 A 0 0 1
[ 6] .comment PROGBITS 0000000000000000 000068 00002b 01 MS 0 0 1
[ 7] .note.GNU-stack PROGBITS 0000000000000000 000093 000000 00 0 0 1
[ 8] .note.gnu.property NOTE 0000000000000000 000098 000020 00 A 0 0 8
[ 9] .eh_frame PROGBITS 0000000000000000 0000b8 000038 00 A 0 0 8
[10] .rela.eh_frame RELA 0000000000000000 000288 000018 18 I 11 9 8
[11] .symtab SYMTAB 0000000000000000 0000f0 000138 18 12 10 8
[12] .strtab STRTAB 0000000000000000 000228 000029 00 0 0 1
[13] .shstrtab STRTAB 0000000000000000 0002a0 000074 00 0 0 1
Key to Flags:
W (write), A (alloc), X (execute), M (merge), S (strings), I (info),
L (link order), O (extra OS processing required), G (group), T (TLS),
C (compressed), x (unknown), o (OS specific), E (exclude),
l (large), p (processor specific)
对
hello.o反汇编,并查看hello.c的 C 程序源码和机器指令的对应关系。1
objdump -S hello.o
反汇编:
1
2
3
4
5
6
7
8
9
10
11
12
13
14
15
16
17
18
19
20
hello.o: 文件格式 elf64-x86-64
Disassembly of section .text:
0000000000000000 <main>:
#include <stdio.h>
int main(void)
{
0: f3 0f 1e fa endbr64
4: 55 push %rbp
5: 48 89 e5 mov %rsp,%rbp
printf("hello world!\n");
8: 48 8d 3d 00 00 00 00 lea 0x0(%rip),%rdi # f <main+0xf>
f: e8 00 00 00 00 callq 14 <main+0x14>
return 0;
14: b8 00 00 00 00 mov $0x0,%eax
19: 5d pop %rbp
1a: c3 retq
练习3-2
如下例⼦ C 语⾔代码:
1 |
|
请问编译为 .o 文件后,global_init, global_const, static_var, static_var_uninit, auto_var 这些变 量分别存放在那些 section ⾥,”hello world!\n” 这个字符串⼜在哪⾥?并尝试⽤⼯具查看并验证你的猜测。
global_init ——-> .data
global_const ——->
.data.rodatastatic_var ——-> .data
static_var_uninit ——-> .bss
auto_var ——->
栈区.text使用
objdump -s -x -d test.o可以得到以下信息1
2
3
4
5
6
7
8
9
10
11
12
13
14
15
16
17SYMBOL TABLE:
0000000000000000 l df *ABS* 0000000000000000 test.c
0000000000000000 l d .text 0000000000000000 .text
0000000000000000 l d .data 0000000000000000 .data
0000000000000000 l d .bss 0000000000000000 .bss
0000000000000000 l d .rodata 0000000000000000 .rodata
0000000000000000 l O .bss 0000000000000004 static_var_uninit.2318
0000000000000004 l O .data 0000000000000004 static_var.2317
0000000000000000 l d .note.GNU-stack 0000000000000000 .note.GNU-stack
0000000000000000 l d .note.gnu.property 0000000000000000 .note.gnu.property
0000000000000000 l d .eh_frame 0000000000000000 .eh_frame
0000000000000000 l d .comment 0000000000000000 .comment
0000000000000000 g O .data 0000000000000004 global_init
0000000000000000 g O .rodata 0000000000000004 global_const
0000000000000000 g F .text 0000000000000022 main
0000000000000000 *UND* 0000000000000000 _GLOBAL_OFFSET_TABLE_
0000000000000000 *UND* 0000000000000000 puts
ch4 嵌入式开发介绍
练习4-1
熟悉交叉编译概念,使⽤ riscv gcc 编译代码并使⽤ binutils ⼯具对⽣成的⽬标文件和可执⾏文件(ELF 格式) 进⾏分析。具体要求如下:
编写⼀个简单的打印”hello world!”的程序源文件
hello.c1
2
3
4
5
6
7
8
int main(void)
{
printf("hello world!\n");
return 0;
}对源文件进⾏编译,⽣成针对⽀持 rv32ima 指令集架构处理器的⽬标文件
hello.o。1
riscv64-unknown-elf-gcc -march=rv32ima -mabi=ilp32 -c hello.c
2022-08-13补充:
Ubuntu20.04系统直接apt install搭建的环境,编译这个练习会报错:
编译命令:
1
/usr/bin/riscv64-unknown-elf-gcc -march=rv32ima -mabi=ilp32 -c hello.c
报错:
1
2
3
4hello.c:1:10: fatal error: stdio.h: No such file or directory
1 | #include <stdio.h>
| ^~~~~~~~~
compilation terminated.根据仓库[issue](stdio.h 头文件找不到 · Issue #I4D6N9 · unicornx/riscv-operating-system-mooc - Gitee.com)可以知道这是工具链的问题,解决方法很简单,根据[howto-run-with-ubuntu1804_zh.md](howto-run-with-ubuntu1804_zh.md · unicornx/riscv-operating-system-mooc - 码云 - 开源中国 (gitee.com))搭建环境即可,这个应该是不挑Ubuntu版本的,我在Ubuntu20.04上已经没问题
查看
hello.o的文件的文件头信息。1
readelf -h hello.o
信息如下:
1
2
3
4
5
6
7
8
9
10
11
12
13
14
15
16
17
18
19
20ELF 头:
Magic: 7f 45 4c 46 01 01 01 00 00 00 00 00 00 00 00 00
类别: ELF32
数据: 2 补码,小端序 (little endian)
Version: 1 (current)
OS/ABI: UNIX - System V
ABI 版本: 0
类型: REL (可重定位文件)
系统架构: RISC-V
版本: 0x1
入口点地址: 0x0
程序头起点: 0 (bytes into file)
Start of section headers: 556 (bytes into file)
标志: 0x0
Size of this header: 52 (bytes)
Size of program headers: 0 (bytes)
Number of program headers: 0
Size of section headers: 40 (bytes)
Number of section headers: 11
Section header string table index: 10
查看
hello.o的 Section header table。1
readelf -S hello.o
信息如下:
1
2
3
4
5
6
7
8
9
10
11
12
13
14
15
16
17
18
19
20There are 11 section headers, starting at offset 0x22c:
节头:
[Nr] Name Type Addr Off Size ES Flg Lk Inf Al
[ 0] NULL 00000000 000000 000000 00 0 0 0
[ 1] .text PROGBITS 00000000 000034 000038 00 AX 0 0 4
[ 2] .rela.text RELA 00000000 000190 000048 0c I 8 1 4
[ 3] .data PROGBITS 00000000 00006c 000000 00 WA 0 0 1
[ 4] .bss NOBITS 00000000 00006c 000000 00 WA 0 0 1
[ 5] .rodata PROGBITS 00000000 00006c 00000d 00 A 0 0 4
[ 6] .comment PROGBITS 00000000 000079 000029 01 MS 0 0 1
[ 7] .riscv.attributes RISCV_ATTRIBUTE 00000000 0000a2 000026 00 0 0 1
[ 8] .symtab SYMTAB 00000000 0000c8 0000b0 10 9 9 4
[ 9] .strtab STRTAB 00000000 000178 000018 00 0 0 1
[10] .shstrtab STRTAB 00000000 0001d8 000054 00 0 0 1
Key to Flags:
W (write), A (alloc), X (execute), M (merge), S (strings), I (info),
L (link order), O (extra OS processing required), G (group), T (TLS),
C (compressed), x (unknown), o (OS specific), E (exclude),
p (processor specific)
对
hello.o反汇编,并查看 hello.c 的 C 程序源码和机器指令的对应关系。注意:直接使用
objdump不行,因为不支持riscv架构。2022-08-13补充:
提示如下:
1
2hello.o: 文件格式 elf32-little
objdump: can't disassemble for architecture UNKNOWN!所以使用以下命令:
1
riscv64-unknown-elf-objdump -S hello.o
信息如下:
1
2
3
4
5
6
7
8
9
10
11
12
13
14
15
16
17
18
19
20
21
hello.o: 文件格式 elf32-littleriscv
Disassembly of section .text:
00000000 <main>:
0: ff010113 addi sp,sp,-16
4: 00112623 sw ra,12(sp)
8: 00812423 sw s0,8(sp)
c: 01010413 addi s0,sp,16
10: 000007b7 lui a5,0x0
14: 00078513 mv a0,a5
18: 00000097 auipc ra,0x0
1c: 000080e7 jalr ra # 18 <main+0x18>
20: 00000793 li a5,0
24: 00078513 mv a0,a5
28: 00c12083 lw ra,12(sp)
2c: 00812403 lw s0,8(sp)
30: 01010113 addi sp,sp,16
34: 00008067 ret
练习4-2
基于 练习 4-1 继续熟悉 qemu/gdb 等⼯具的使⽤,具体要求如下:
将
hello.c编译成可调式版本的可执⾏程序a.out1
riscv64-unknown-elf-gcc -g -march=rv32ima -mabi=ilp32 hello.c
先执⾏
qemu-riscv32运⾏a.out。1
qemu-riscv32 ./a.out
可以看到控制台输出以下内容:
1
hello world!
使⽤
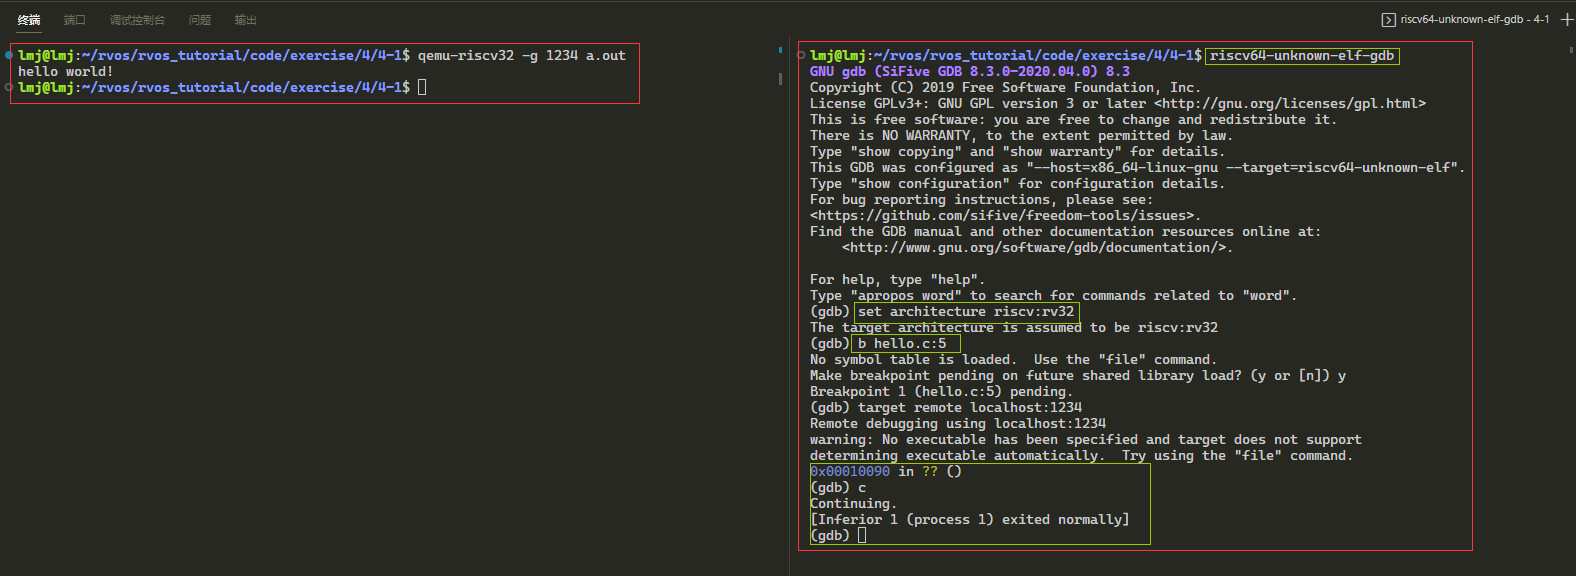
qemu-riscv32和 gdb 调试a.out。这里会用到两个终端,一个终端打开qemu并同时监听1234端口;一个终端打开gdb,连接1234端口,步骤如下:
在终端1,使用
qemu-riscv32 -g 1234 a.out这时在终端2,使用
riscv64-unknown-elf-gdb直接进入gdb(不要使用默认的gdb,不支持rv32)- 随后在gdb中使用
set architecture riscv:rv32设置架构 - 然后设置断点(因为只有
hello world一行代码),b hello.c:5 - 最后使用
target remote localhost:1234连接qemu
- 随后在gdb中使用
这时终端2会显示
1
2
3
4Remote debugging using localhost:1234
warning: No executable has been specified and target does not support
determining executable automatically. Try using the "file" command.
0x00010090 in ?? ()这是因为我们设置了断点,想运行的话按
r或者c最后在终端一可以看到
hello world!
练习4-3
⾃学 Makefile 的语法,理解在 riscv-operating-system-mooc 仓库的根⽬录下执⾏ make 会发⽣什么。
ch5 RISC-V汇编语言编程
练习5-1
对 code/asm/sub 执⾏反汇编,查看 sub x5, x6, x7 这条汇编指令对应的机器指令的编码,并对照 RISC-V 的 specificaion ⾃⼰解析该条指令的编码。
使用
make hex可查看二进制编码1
200000000 13 03 f0 ff 93 03 e0 ff b3 02 73 40 6f 00 00 00 |..........s@o...|
00000010由于指令是四字节对齐的,所以可以知道
b3 02 73 40是sub x5,x6,x7对应的16进制编码,并且是小端序,所以可以分析出该指令值为0x407302b3,同时可以使用make code进行求证针对
0x407302b3可以先转成二进制:01000000-01110011-00000010-10110011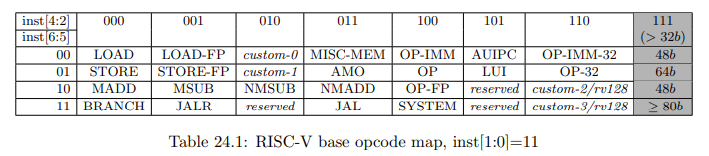
该图可知,指令的低7位可以确定指令类型,该指令低7位:0110011,分析得出该指令属于
OP,R-Type类型接下来可以查看
funct3与funct7,funct3在1214位,31位funct7在25可以得到
funct3为000,funct7为0100000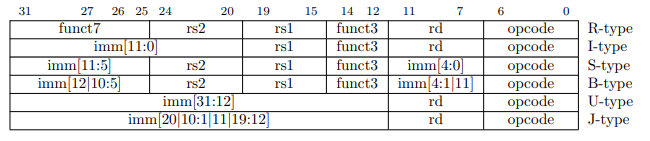
opcode、funct3、funct7可以确定指令了

寄存器由上图可知:rd为7
11,rs1为1518,rs2为20~24,分析可知:rd=00101→x5;rs1=00110→x6;rs2=00111→x7
现知道某条 RISC-V 的机器指令在内存中的值为 b3 05 95 00,从左往右为从低地址到⾼地址,单位为 字节,请将其翻译为对应的汇编指令。
该值化为易读形式:0x009505b3,再化为二进制:00000000-10010101-00000101-10110011
首先分析opcode:0110011,为
OP,R-Type类型然后分析funct3、funct7:分别为000,0000000,结合opcode,分析得出该指令为
add指令随后分析寄存器:rd=01011→x11,rs1=01010→x10,rs2=01001→x9
最后该指令为:
add x11,x10,x9可以写代码验证:

练习5-2
假设有如下这么一段C语言程序代码,尝试写一段汇编代码,达到等效的结果,并采用gdb调试查看执行结果,注意请使用寄存器来存放变量的值:
1 | register int a, b, c, d, e; |
首先定义变量使用了
register,意为将变量保存在寄存器中,和“注意”里边的相照应汇编代码:
1
2
3
4
5
6
7
8
9
10
11
12
13
14
15.text
.global _start
_start:
li x5, 1 # b = 1
li x6, 2 # c = 2
li x7, 3 # e = 3
add x9, x5, x6 # x9 = x5 + x6 # a = b + c
sub x10, x9, x7
stop:
j stop
.end直接
make && make debug就可以得到如下结果(gdbinit中display了x5到x11寄存器)1
2
3
4
5
6
7
8
9stop () at test.s:19
19 j stop
=> 0x80000014 <stop+0>: 6f 00 00 00 j 0x80000014 <stop>
1: /z $x5 = 0x00000001
2: /z $x6 = 0x00000002
3: /z $x7 = 0x00000003
4: /z $x9 = 0x00000003
5: /z $x10 = 0x00000000
6: /z $x11 = 0x87e00000
练习5-3
假设有如下这么一段C语言程序代码,尝试写一段汇编代码,达到等效的结果,并采用gdb调试查看执行结果,注意请使用寄存器来存放变量的值:
1 | register int a, b, c, d, e; |
本练习和练习5-2差不多,不过是运算稍复杂
1
2
3
4
5
6
7
8
9
10
11
12
13
14
15
16.text
.global _start
_start:
li x1, 1 # b = 1
li x2, 2 # c = 2
li x3, 3 # d = 3
li x4, 4 # e = 4
add x1, x1, x2
add x3, x3, x4
sub x5, x1, x3
stop:
j stop
.end不过上述代码最后输出结果如下,x5为
0xfffffffc,x5为-4,而负数在计算机中使用补码表示,可以计算一下它的原码:减一然后按位取反- 减一:
0xfffffffb,二进制:1111 1111 1111 1111 1111 1111 1111 1011 - 取反:
0x00000004,二进制:0000 0000 0000 0000 0000 0000 0000 0100
1
2
3
4
5
6
7
8
9
10
11Breakpoint 1, stop () at test.s:23
23 j stop
=> 0x8000001c <stop+0>: 6f 00 00 00 j 0x8000001c <stop>
1: /z $x1 = 0x00000003
2: /z $x2 = 0x00000002
3: /z $x3 = 0x00000007
4: /z $x4 = 0x00000004
5: /z $x5 = 0xfffffffc
6: /z $x6 = 0x00000000
7: /z $x7 = 0x00000000
(gdb)- 减一:
练习5-4
给定一个32位数0x87654321,先编写c程序,将其低16位(0x4321)和高16位(0x8765)分别分离出来保存到独立变量中;完成后在尝试采用汇编语言实现类似效果
通过逻辑左右移就可以了
C语言
1
2
3
4
5
6
7
8
9
10
11
12
13
14
15
16
17
18
19
void foo()
{
unsigned int i = 0x87654321;
unsigned int high = i >> 16;
unsigned int low = (i << 16)>>16;
printf("i = 0x%x\n"
"high = 0x%x\n"
"low = 0x%x\n", i, high, low);
}
int main(void)
{
foo();
return 1;
}RISC-V汇编
1
2
3
4
5
6
7
8
9
10
11
12
13
14
15
16# exercise 5-4
.text
.global _start
_start:
li x1, 0x87654321
srli x2, x1, 16
slli x3, x1, 16
srli x3, x3, 16
stop:
j stop
.end
练习7-1
要求:完全采用汇编语言重写01-helloRVOS, 运行后在控制台打印输出”Hello, RVOS!”
- 字符数组这儿,即代码中的
.data后边的内容放在目前位置没问题,先前放在_start前边就G了,具体原因待排查
1 | #include "platform.h" |
练习7-2
要求:参考01-helloRVOS,在此基础上采用轮询方式读取控制台上输入的字符并回显在控制台上。另外用户按下回车后能够另起一行从头开始
为节省篇幅,只记录修改部分
- 纯单片机编辑,读写寄存器就完事。
1 | /* kernel.c */ |
1 | /* uart.c */ |